CSS currentColor value
A few days ago, I started to learn CSS and HTML. I already played with CSS and HTML but I had a very very limited knowledge.
As I don't like to repeat a code or a property value, I found recently that you can apply a color (defined once) in different properties.
Let's see an example:
div {
    color: blue;
    border: 1px solid currentColor;
}
With the currentColor property you indicate that you'll use the value of the color property in other properties that accept a color value.
With my example, the border color will be blue.
You can even use it in a cascade:
body {
    color: blue;
}
div {
     border: 1px solid currentColor;
}
Update Jeedom from version 4.0.x to 4.1.x
Well, Mr. Hunt, this is not Mission: Difficult, its Mission: Impossible. Difficult should be a walk in the park for you. - Boss, Mission: Impossible 2
Sometimes, a simple update is harder than you think. Since years, I've a Jeedom running on a Raspberry 3B+ and the last Jeedom update installed is the version 4.0.x hosted in a Debian 9 Stretch.
A few days ago I saw that the Jeedom 4.1.x was available with some really nice improvements.
The condition to be able to install this version is to have the Debian 10 Buster installed. As we can read in the install documentation, the best thing to do is to backup your Jeedom and install everything from scratch.
And that's what I did, downloaded the ISO x86, burned the SDCard, booted on it and installed Jeedom with the command line.
Right after that, I restored my Jeedom backup (I'll not describe that part here).
Now the fun part begins: Boot from the SSD.
When you check some websites, you'll read that you just need to install Debian on the SSD, plug it in the Raspberry and restart the device to boot from the SSD. But there are lies! (It was in my case)
The best thing I could find was to clone my SDCard to my SSD and it was really easy with the rpi-clone script.
rpi-clone is a shell script that is for cloning a running Raspberry Pi booted source disk (SD card or USB disk) to a destination disk which will be bootable. Destination disks are SD cards in the SD card slot or a USB card reader, USB flash disks, or USB hard drives.
First, clone the repository and copy the setup in your /usr/local/sbin directory:
git clone https://github.com/billw2/rpi-clone.git
cd rpi-clone
sudo cp rpi-clone rpi-clone-setup /usr/local/sbin
Stop the following services:
sudo service mysql stop
sudo service cron stop
sudo service apache2 stop
sudo service nginx stop
Connect your SSD to your Raspberry and clone your SDCard to your SSD:
rpi-clone sda -f
When it's done, you can restart the services:
sudo service mysql start
sudo service cron start
sudo service apache2 start
The next thing to do is to configure your Raspberry to be able to boot on the USB port. For that, you'll need to backup your current config.txt file, set the boot mode and then restart the Raspberry:
cp /boot/config.txt /boot/config.txt.old
echo program_usb_boot_mode=1 | sudo tee -a /boot/config.txt
sudo reboot
When your device restarted, you can check if the boot mode is set to boot on USB with the following command:
vcgencmd otp_dump | grep 17
>17:3020000a
If it returns 17:3020000a, the setting has been taken into account. Now we need to change the boot config to be able to boot on the SSD.
Get the PARTUUID from your SSD (/dev/sda2):
sudo blkid

Backup your current cmdline file:
sudo cp /boot/cmdline.txt /boot/cmdline.txt.bak
Edit the cmdline file and replace the PARTUUID with the value we copied from the sudo blkid command, save and quit:
sudo nano /boot/cmdline.txt

When it's done, you can reboot again:
sudo reboot
After the reboot, the following command should display the /dev/sda2 device:
findmnt -n -o SOURCE /
> /dev/sda2
Almost finished, now you need to change fstab to use the PARTUUID from your SSD device, save, quit and reboot again:
sudo nano /etc/fstab

sudo reboot
The next step is done to create a new partition on your SSD. As you'll see later, the partition size on your SSD is the same as your SDCard. Here we want to use the entire SSD disk size:
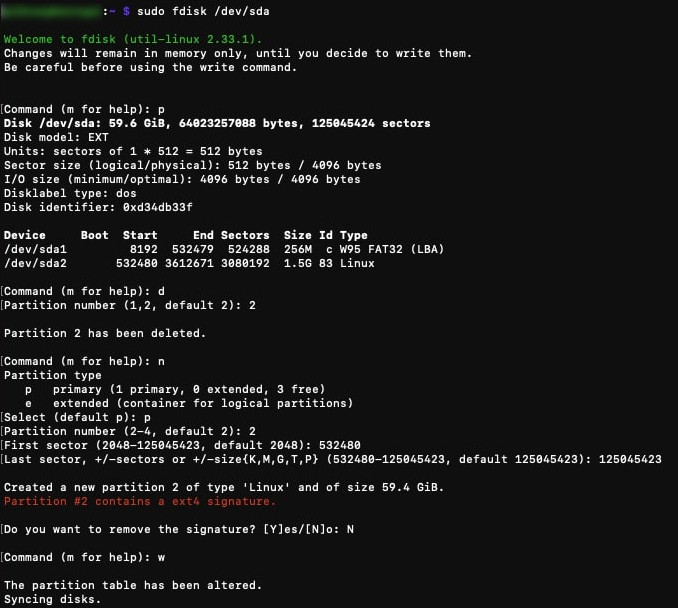
You'll need to reboot again when the partition is created. This time it may take a little longer.
It's not yet finished, now you need to resize the partition:

If everything went well, you should see the new partition size with the df command:
df -h

Refresh the Xiaomi door sensor status with a scenario in Jeedom
Since the beginning I've never had an issue with my Xiaomi sensors but for no reason one of them started to not update his status.
If I close the door Jeedom still displays the door as opened.
I couldn't find the reason and I discovered that a simple refresh command could reset the status and display the right information.
If you don't want to refresh the status manually, you can do it with a scenario.
First, create a triggered scenario on the Xiaomi sensor for the opening command and give a name to your scenario.
Then in the scenario definition:
- add a Sleep action for 10 seconds
- add a refresh command from your Xiaomi sensor
- add an IF condition and check if the opening command value is equal to 1 (open)
- add a THEN condition to execute your current scenario
If the status changes, the scenario will wait 10 seconds and then execute the sensor refresh command. If the status is still equal to 1 (open), it will execute again the current scenario.

Now if the door is closed and the status is not up to date the scenario will update it after 10 seconds.
How to display device name in your Pi-hole
When your Pi-hole doesn't act as a DHCP server (because you already have another one) you'll able to see only the IP addresses of the devices.
Not really user-friendly when you need to analyze the log of the Pi-Hole.
But don't be afraid, there is a solution!
To be able to see the device name, you just need to enable the Use Conditional Forwarding setting in the Settings - DNS.
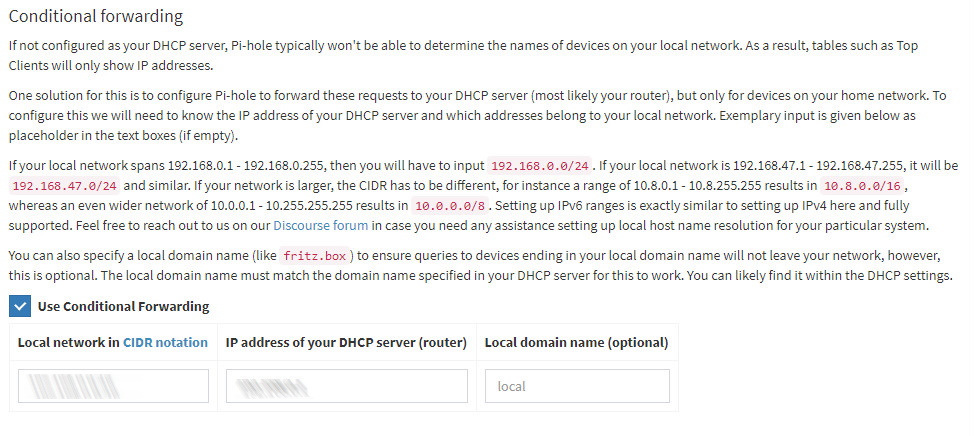
When the option is enabled, enter the local network to use and the IP address of your DHCP server as described in the screenshot, save and it's done. It's magic.
Accept DNS queries to specific IP addresses within your Dream Machine Pro
Holidays are nice when you want to try something new.
In my case, I wanted to install a Pi-Hole.
If you never heard about Pi-Hole, it's a DNS sinkhole that protects your devices from unwanted content, without installing any client-side software.
My post isn't a How-to install/configure/... the thing.
Here we'll see how to create firewall rules on the Dream Machine Pro to refuse all DNS queries except the one to the Pi-Hole.
The first thing to do is to create two groups in the firewall settings.
One to specify the DNS port to block (53) and another one to contain the IP addresses that will be used to accept DNS queries (The Pi-Hole address and maybe some other DNS addresses).
I use groups to be able to add/remove address or port as I wish.
First group
- Name: DNS Port
- Type: Port
- Port value: 53
Second group
- Name: DNS to Accept
- Type: Address IPV4
- Address: The address of your PI-Hole and maybe some other public DNS addresses
When it's done, we need to create two firewall rules. One to block all outbound traffic to the port 53 and another one to accept all outbound traffic to the port 53 but only for the addresses we trust.
First rule
- Name: Accept DNS Group
- Rule applied: Before predefined rules
- Action: Accept
- Source Type: Address/Port group
- Source IPv4 Address Group: Any
- Source Port Group: Any
- Destination Type: Address/Port group
- Destination IPv4 Address Group: DNS to Accept (the second group we created)
- Destination Port Group: DNS Port (the first group we created)
Second rule
- Name: Drop other DNS
- Rule applied: Before predefined rules
- Action: Drop
- Source Type: Address/Port group
- Source IPv4 Address Group: Any
- Source Port Group: Any
- Destination Type: Address/Port group
- Destination IPv4 Address Group: Any
- Destination Port Group: DNS Port (the first group we created)
With these rules, the devices connected to our LAN will only use the DNS we trust and if a malware tries to bypass our DNS, it will be blocked by the second firewall rule.