Add the Xiaomi Air Purifier 3C in Jeedom
The Xiaomi air purifier is a wifi device and to be able to use it in Jeedom you'll need to extract its token.
It's possible to extract the token by using an old version of the Mi-Home app or using various strange manipulations.
For me it never worked and by chance I found the Xiaomi Cloud tokens extractor.
Before to use it, you need to add your purifier in the Mi-Home app and then you can execute the "token_extractor.exe".
The tool will ask you to enter your Mi-Home login, your password and the server to use. The last information isn't mandatory and if omitted the tool will scan all countries and will list different information about your devices.
For the purifier we just need to get the token.
As I've the Xiaomi Home plugin in Jeedom I thought it would be easy to add my new toy but it never worked (the information returned by the commands were always empty).
After a few searches, I found the miiocli tool that can be installed on your Jeedom host (you'll be able to see a list of compatible devices on the Github page).
First connect via SSH to your Jeedom host and execute the following command to install the JQ tool (used to manipulate JSON structure)
sudo apt-get install jq -y
Then you can install the miiocli tool:
sudo apt-get install libffi-dev libssl-dev -y
sudo pip3 install python-miio
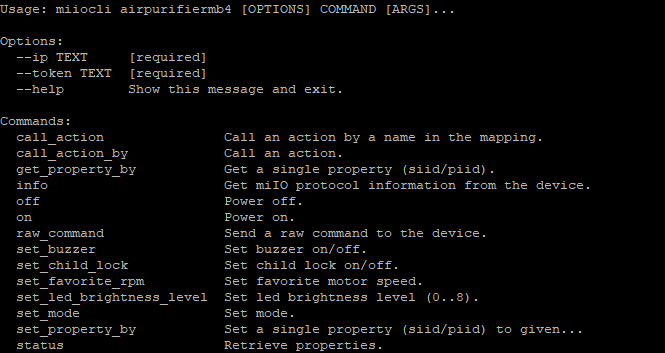
To be able to see what you can do with the Air Purifier 3C, you can type the help command and it will describe the options and commands you can use:
sudo miiocli airpurifiermb4 --ip [YourPurifierIP] --token [YourPurifierToken] --help
The parameter "airpurifiermb4" is the device type to use with the command and is linked to the Xiaomi Air Purifier 3C.
When you validate the previous command, you'll see all the commands available to control your purifier.
In the following screenshot, I added a new script in Jeedom to be able to control my device.
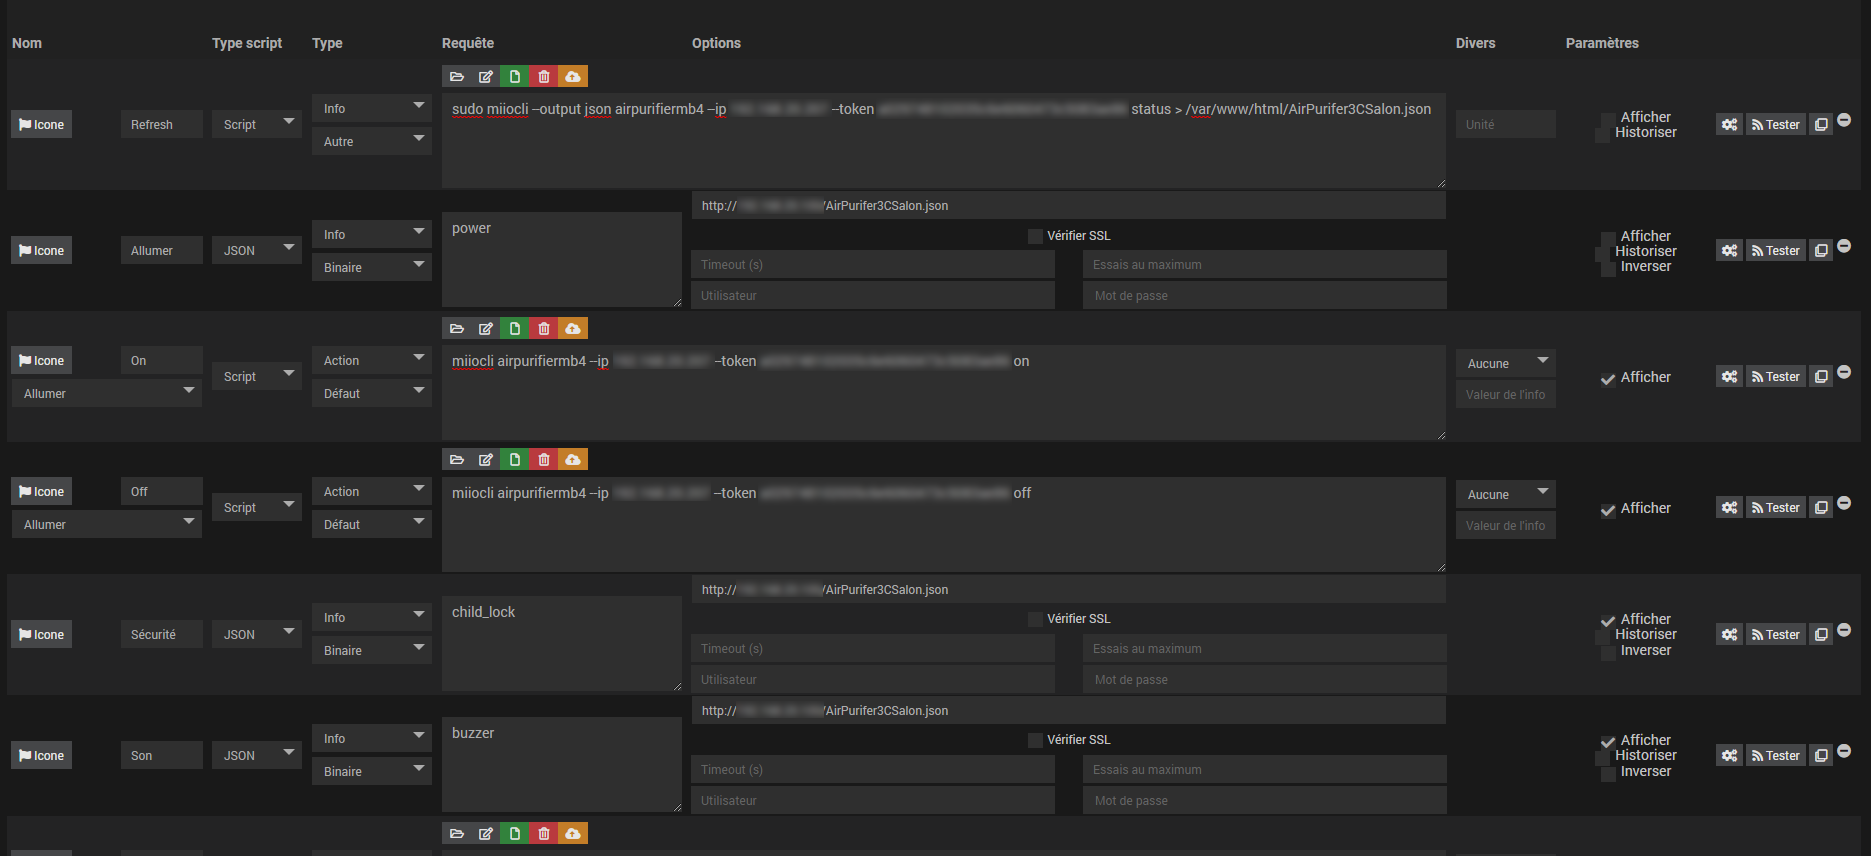
The first command is used to get a json with all the information from the purifier (power, air quality, ...) and then I save it in a file on my server (don't forget to set the IP of your purifier and its token).
The second command is used to query the json file and get the power value (enter the IP of your Jeedom host).
The third command is used to power on the purifier and so on...
As you understood the sample, you'll be able to add more commands to get the rest of the information and with a few click you'll have a widget to control your device and I'm sure most of you will have a better design.
Force HTTPS access in Apache
If you configured a certificate to access your Jeedom with HTTPS and you don't want to let the HTTP access available, you can change your Apache settings to redirect HTTP access to the HTTPS automatically.
You'll need to ssh on your Jeedom server and edit the following file:
nano /etc/apache2/sites-available/000-default.conf
The part we want to modify is the virtual host defined for the HTTP port (80)
<VirtualHost *:80>
        ServerAdmin webmaster@localhost
        DocumentRoot /var/www/html
        ErrorLog /var/www/html/log/http.error
</VirtualHost>
And we'll edit the file to rewrite the HTTP access to the HTTPS access
<VirtualHost *:80>
        ServerAdmin webmaster@localhost
        DocumentRoot /var/www/html

        RewriteEngine on
        RewriteCond %{SERVER_NAME} =My.JeedomDomain.com
        RewriteRule ^ https://%{SERVER_NAME}%{REQUEST_URI} [END,QSA,R=permanent]

        ErrorLog /var/www/html/log/http.error
</VirtualHost>
You need to replace the "My.JeedomDomain.com" by your actual domain name used to access your Jeedom from outside your network.
When it's done, you just need to enable the rewrite module and restart Apache:
a2enmod rewrite
systemctl restart apache2
Secure the access to your Jeedom with Certbot
A few days ago, I created a post on how to redirect the HTTPS external traffic to a Jeedom in a private network.
Everything will work but you'll see in your browser that the website isn't secure. The reason is that there is no certificate available on your webserver (on your Jeedom).
To generate, use and auto renew a certificate we'll use CertBot
Certbot is a free, open source software tool for automatically using Let’s Encrypt certificates on manually-administrated websites to enable HTTPS.
Certbot is made by the Electronic Frontier Foundation (EFF), a 501(c)3 nonprofit based in San Francisco, CA, that defends digital privacy, free speech, and innovation.
First, open a SSH connection to your Jeedom.
Install snapd
sudo snap install core; sudo snap refresh core
Install Certbot
sudo snap install --classic certbot
Check if you can run the certbot command
sudo ln -s /snap/bin/certbot /usr/bin/certbot
To get a certificate and have certbot automatically change your Apache configuration to serve it and to turn on HTTPS access in a single step, use the following command:
sudo certbot --apache
The certbot comes with a cron to automatically renew your certificate. But if you want to check if the auto renewal is working, you can use this command:
sudo certbot renew --dry-run
If it completes without errors, your certificate will be renewed automatically.
Please note that your HTTP(80) and HTTPS(443) port must be opened or the auto renewal will not work.
Now you can try to access your Jeedom with the HTTPS url and you'll see that the browser will display that the connection is "secure".
As a wise man said once:
HTTPS & SSL doesn't mean "trust this." It means "this is private." You may be having a private conversation with Satan.
— Scott Hanselman (@shanselman) April 4, 2012
Please note that you'll need to change your Jeedom configuration to add the HTTPS URL (and port) to be able to use the HTTPS URL to access Jeedom.
Redirect HTTP/HTTPS port to your Jeedom
In the previous blog post we saw how to create a custom domain name to point to our public IP address. The main goal was to be able to access our Jeedom from outside our private network.
But if you just type your public IP address or use the new custom domain name to access Jeedom you'll just hit your modem or firewall and they'll not know what do to with the traffic. And you can be sure the traffic will not go to your Jeedom by default.
If you're using a Dream Machine Pro (controller 6.2.26) you can redirect the HTTP/HTTPS traffic to your Jeedom by following these steps:
- Open your Dream Machine Network Manager web page
- Go to Advanced features - Advanced Gateway Settings and click on the Create a new Port Forwarding button
- Fill in the form as below and validate
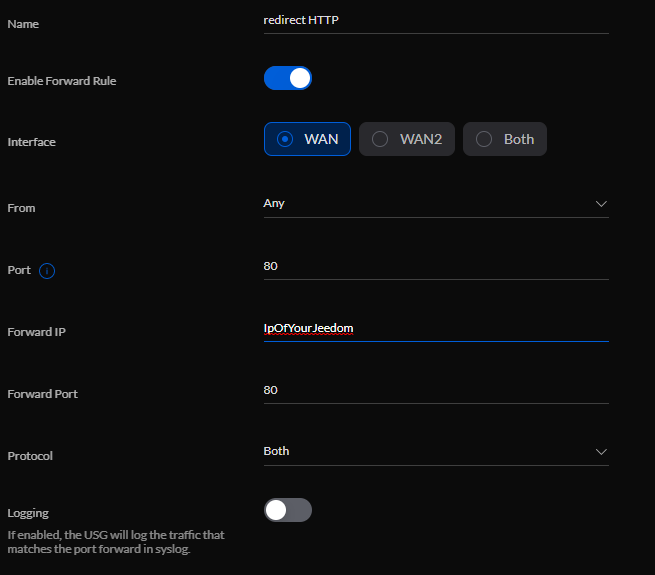
You can repeat the process to redirect the HTTPS port (443).
Now if you enter your custom domain in a browser, you'll be able to access your Jeedom in your private network
Create a DynHost to access your Jeedom
If you want to access your Jeedom from outside your private network, you can do it using your public IP address or using a custom domain name pointing to your public IP address (if the HTTP or HTTPS port is opened).
For me and maybe for you, it's easier to remember a custom domain name and I decided to go with one on OVH.
Now that I have my custom domain I would like to use it to access my Jeedom and trust me or not, I didn't know it was so simple.
Create a new user

Go in the DynHost menu and choose to create a username.
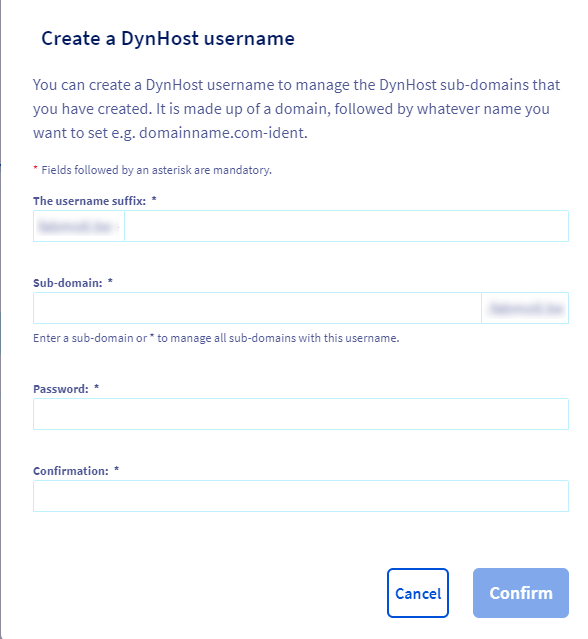
- Enter a username suffix
- Enter the sub-domain that you want to define to point to your Jeedom
- Define a password to use with your username and confirm
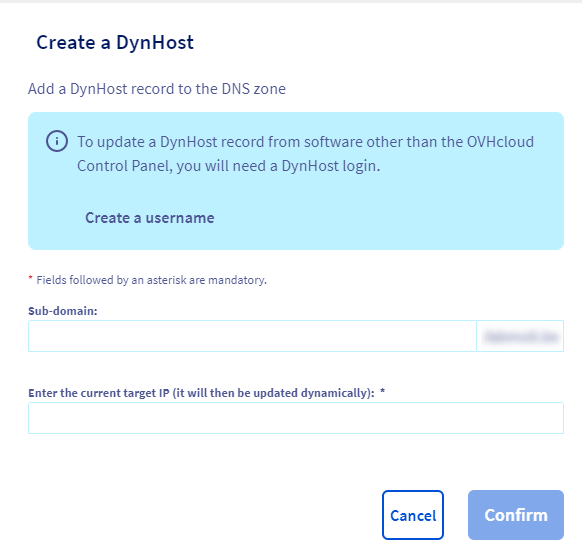
Create a DynHostRecord
When it's done, you can add a new DynHost record and re-enter the sub-domain name you choosed earlier, enter the target IP (the public IP address of your Jeedom) and confirm.

If you want to know your public IP address you can go to whatismyipaddress and copy the address displayed in the IPv4 field.
In an upcoming blog post, we'll see how to automatically refresh your public IP address to DynHost (if you don't have a fixed IP address) and how to redirect incoming traffic on the HTTP port to your Jeedom.